Saturday, September 21, 2013

Gladiators of the Athasien Arena

As I mentioned in my post about the StarCraft-themed Space Marines, a number of years ago, before the first Aquilla-allied figure hit the market even, my son Benjamin and I created a Valkyrie named Wyndar to be the General for some custom figures we were introducing to the game.

Wyndar called the desert home and was a home for a number of Mage Knight figures that we were customizing for Heroscape play.  We were including figures like pirates, assassins, and various other sorts of creatures.


On Labor Day this year, I had some friends over to play an arena game.  The arena I build was called the Athasien Arena.  It's an arena that belongs to Wyndar.  Here's what the board looked like:


The arena board concept originally came from a post on the original Heroscape website operated by Hasbro (which has since been taken down, of course).  It was called "Taelord's Coliseum" though I modified it somewhat, of course.  It's a good basic scenario that doesn't take that long to play when you need a nice solid game that doesn't last too long.
 
 
We had a great game and a great afternoon of fun, fellowship, and combat in the arena.


Here was the setup for the game and the special rules of play:
 
The Valkyrie Wyndar, Scourge of the Wastelands, Lord of Jutangaard, Master of the Noatun, and Archkyrie of Elswin, is a cruel and insatiable general.  Wyndar has an unquenchable thirst for blood, sweat, and tears, and he encourages his subjects and his armies to savor the same.

Wyndar has ordered his armies to wound and capture enemy combatants when they can, and to return these prisoners across the desert to the Athasien Arena.  There, their wounds will be treated and they will be prepared by the trainers to be gladiators…to fight and suffer…to kill and be killed on the sands of the arena.  Occasionally, Wyndar will even compel one of his own soldiers to fight in the arena, ether to punish him or to punish the others who are placed in the arena with him.

A fight in the Athasien Arena is a tiresome and bloody ordeal.  Beasts are released into the arena with the gladiators to add an element of unpredictability , and the crowds which gather to watch the games reflect their master’s unquenchable thirst for bloody combat.  If a gladiator displeases the crowd they will turn on him, possibly even attacking him from the stands, and if the crowd feels that a gladiator has become too badly wounded to be entertaining, they may decide to execute him immediately.

The game begins with eighteen heroes and ends when only six remain.  Wyndar keeps the gladiators fighting by promising them freedom if they perform well in the arena…and if they survive it.  The better you are at killing, the sooner you can earn your freedom from the Athasien Arena.  There are ways for gladiators to gain advantages in the games, however, provided you can provide enough incentive for others to help you, and even the favor of raucous crowd can be swayed…for the right price.

The Athasien Arena is a hostile and suffocating place.  Death in the arena will bring release from captivity and the games, but it is an excruciatingly painful path. 

In the Athasien Arena, it is never a good day to die.

Special Rules of Play:
Piles of Corpses.  When a figure is destroyed, replace it with a hexagonal Corpse Marker.  Spaces with a Corpse Marker on them add one level of elevation for each Corpse Marker on it.
 
Wyndar’s Ruling.  If a hero figure receives wounds and has only one life remaining, the crowd will vote to see if that hero may continue in the game.  The host rolls 10 Wyndar Valkyrie Dice.  If you roll four or less skulls, the figure remains on the board.  If five or more skulls are rolled, the hero is destroyed.  If three or more Wyndar symbols are rolled, the figure remains no matter how many skulls are rolled.
 
Crowd Attack.  When a player moves his or her figure moves into the Crowd area, he or she must immediately roll a 20-sided.  If the player rolls a 15 or higher, the crowd does nothing.  If the player rolls a 1-14, the host attacks that figure with a nearby Squad.  When a player moves a figure already in the Crowd area, if the figure ends its move in the Crowd area, that player must also roll the 20-sided die for Crowd Attack.  The player who successfully bribes the Crowd is never attacked by the Crowd (see below).
 
Crowd Approval Rating.  At the end of each round, each player except the player who successfully bribed the Crowd (see below) must roll the 20-sided die.  The player who rolls the lowest will receive sniper shots.  Sniper shots are taken one at a time for each of that player’s heroes.  The host rolls the 20-sided die.  If he or she rolls a 19 or higher, that hero is destroyed.
 
Releasing the Animals.  At the end of the first round, after sniping shots have been taken, a squad of animals is released into the arena.  Control of squad of animals is determined by Player Bribes (see below).  When a player takes control of a squad of animals, he or she may immediately take a turn with them.  At the end of the second round, after sniping shots have been taken, and the first squad of animals released has taken a turn (if possible), another squad of animals is released.  A third squad of animals is released after the third round in the same manner (first squad, second squad, then third squad).  After the fourth round, continue taken turns with the squads of animals in the appropriate order (if possible).  Order Markers can never be placed on the animal’s Army Card, but they can defend themselves if attacked.
 
Player Bribes. Before drafting begins, each player fills out a “Gold Distribution Sheet.”  Players may distribute 100 gold pieces in any amounts to any and all of the following individuals or group:
  • Gladiator Trainer
  • High Priest of Dagmar
  • Crowd
  • Animal Trainer
Players may not distribute more than 100 gold pieces in total.  Here's a copy of the sheet I gave out:
 
 
When all players have returned their distribution sheets to the host, the host will declare which player has successfully earned the favor of each individual or group.  (The player who successfully earns the favor of an individual or group is the player who offers them the most gold.)
 
The Gladiator Trainer.  The player who successfully earns the favor of the Gladiator Trainer begins the draft.  Other players draft in descending order the bribe amount offered.  Each player must draft three heroes according to the following maximum point schedule:
  • 400 points: to the player who successfully bribes the Gladiator Trainer.
  • 380 points: to the player with the second highest bribe.
  • 360 points: to the player with the third highest bribe.
  • 340 points: to the player with the fourth highest bribe.
  • 320 points: to the player with the fifth highest bribe.
  • 300 points: to the player with the lowest bribe.

The High Priest of Dagmar.  The player who successfully earns the favor of the High Priest of Dagmar adds 10 to his or her initiative roll.  All other players add 1 to their initiative roll for each 10 pieces of gold they offered to the High Priest.
 
Throwing Money to the Crowd.  The player who successfully earns the favor of the Crowd is never attacked by the crowd and is never sniped.  All other players add 1 to their Crowd rolls (Crowd Approval Rating and Crowd Attack) for each 10 pieces of gold they offered to the Crowd.
 
The Animal Trainer.  The player who successfully earns the favor of the animal trainer will receive control of the squad of animals released into the arena after the first round.  The player who offers the second highest amount of gold to the Animal Trainer will receive control of the squad released after the second round.  The player who offered the third highest amount of gold will receive control of the squad released after the third round.
 
Game’s End: The game ends immediately when there are only six remaining heroes.
 
Winning the Game: The player who has the most points and has at least one hero remaining at the end of the game wins the game.
 
Points: Points are earned in the following manner:
  • Each player receives points equal to the point value of each hero he or she destroys during the game, including heroes destroyed by animals that player controlled. (For figures destroyed by Wyndar’s Ruling, the player whose attack activated Wyndar’s Ruling receives the points for that hero.  No player receives points for heroes destroyed by the Crowd.)
  • Each player receives points equal to the point value of each hero he or she has remaining at the end of the game.
  • Each player receives 100 points for each hero he or she has remaining at the end of the game.
Before the game began, I left the players with the follow blessing I attributed to Anna Karithon: “May your steps ever fall beyond the watch of Wyndar.”
 
As I said, it was a great afternoon,and a great game.  Next up for us is our fifth annual Halloween Heroscape event, a continuation of the story we began two years ago in the search for the Deathly Hallows at Grim's Hollow.
 
Until then, happy Heroscaping...

Friday, August 16, 2013

Heart of the Swarm

A while ago now, I built a board called "Heart of the Swarm". 


It's a swamp board on which we played a couple of different scenarios.  The first scenario was a four-player (two per team) game to test out the strength of my StarCraft-inspired custom figures (Click Here for More on Them) by pitting them against a swarm of Marro, including two hives.


Despite being severely under-pointed, the Marines decimated the Marro swarm.  We weren't sure if the Marines' points needed to be adjusted or if they were just particularly effective against the Marro.  No points have been adjusted yet...

The second scenario we played on the board was called "John Jameson's Capture the Keg".  I placed a barrel under the tower on each end of the board.  The object was to have one of your figures adjacent to the barrel and unengaged at the end of a round.  If you managed that, you'd captured the keg and won the game.


Time was running out and people had to go home, and with the last round, this is as close as Charles and Woody got because Woody put his last Order Marker on the wrong card. 


So sad...

Then, of course, the board was up for a while between those two games, so the boys played a few free games on it, too.


All in all, "Heart of the Swarm" is a pretty good board for a variety of scenarios or just for free play. 

In addition to the regular swamp and jungle terrain pieces, the board did have some custom pieces added to it as well, including the towers on each end.  I find that aquarium décor (like the towers on this board) is great for adding character and obstacles to Heroscape boards.  I also added some swamp/jungle plants of my own (from aquarium plants) as well as a couple of aquarium rock pieces.
 

 I also used some custom terrain pieces on this board including Mud tiles and Blade Grass tiles.  The mud tiles were created by modifying a pattern created and shared by Delphic on heroscapers.com. 


Delphic's original design was for molten lava, but I recolored it for mud, printed it on sticker paper, then printed the hex patterns Delphic provided overtop.  I put the printed sticker paper onto 1/4 inch Styrofoam sheets and cut them out.  They work pretty well. 

We played it that whenever you stepped onto a mud space, you had to roll the d-20.  If you rolled 1-7 (or something), you got stuck in the mud and you had to bring a friendly figure adjacent to the stuck figure before it could move again (like the Glyph of Proftaka).

The other custom terrain piece on this board is Blade Grass. 


The Blade Grass tiles were made by drilling small holes in a swamp water tiles in specific patterns and hot-gluing aquarium grass into the holes.


The special rules of the Blade Grass are that it you cross a line of grass, you must roll an attack die for each line of Blade Grass you cross.  You take a wound for each skull you roll.   That's why the patterns are important.  You can created a walkable path through the grass or limit movement up onto land forms by creating a wall of Blade Grass.  A figure can move through as a short cut, but not without risk.

I chose to use both red-tipped aquarium grass along with the regular green to suggest that they are blood-stained and dangerous.

I think that's all for now.  I'll post something on Arena games after Labor Day.

Happy heroscaping.


Tuesday, July 30, 2013

Kill the Dragon

So it's been a long while since I've posted anything.  Truth is, it's been a busy year for life and a slow year for Heroscape.  Plus, when we have played, I've forgotten to take pictures, and what fun is a Heroscape blog post without pictures?

But last night we had a game called "Kill the Dragon".  It was a team game with 5 players on one team and 2 players (both played by me) on the other.  We tried to find a way for most of the players to be on the same team against one enemy.  One of the big challenges was to get the balance right in terms of points and Order Markers.  I think we did okay, but it probably still needs a little tweaking.


Here's the pregame story I read to other players before we began...

For centuries, Weston was known for the strength of its steel, due in large part to a deposit of uniquely strong iron discovered under the largest mountain in Weston, thereafter called the Iron Mountain. The mines of the Iron Mountain provided the raw materials for thousands of weapons, and it made the blacksmiths, the people, and the king of Weston incredibly rich.

That is…until he came….Ancalagon the Black. 


He laid waste to fields, devoured flocks, and ravaged villages.  Worst of all, the great and terrible black dragon took up residence in the mines of the Iron Mountain.  Ancalagon’s acid spray line burned deep into the mine, collapsing tunnels and disintegrating miners.

An attempt was made immediately by the king to drive the dragon from the mines, but he was unprepared to face a dragon like Ancalagon.  He barely escaped with his life.  Most of his men did not. 


A second attempt to retake the mines suffered the same fate and a third.  Soon Ancalagon was joined by a mate, Braxas, a terrible and vicious dragon in her own right, and the two spawned many young black dragons, which made retaking the mines a virtual impossibility.  The king of Weston conceded the mountain to Ancalagon, and the mines were lost.


Now, the stores of iron from the Iron Mountain’s mines are long depleted, and the harvests have been sparingly small for the last few years as fields have suffered frequent raids by the offspring of Braxas and Ancalagon.  The economy of Weston has collapsed.  There is no steel to sell and no food to eat.

But there is hope.  A new king has come to the throne in Weston…Godric the Lionhearted, and he has decided to personally address the problem of the black dragons of the Iron Mountain. 

Godric has gathered a contingent of knights, archers, and champions of the realm, including Sir Denrick, the giant hunter, and Sir Taylor, a reputed, if somewhat inexperienced, dragon slayer.  He has also enlisted the assistance of the famed dragon hunter Pavel Halfdane from across the sea. 


Together Godric, his knights, archers, and champions have climbed the pathways up the Iron Mountain to face the terrible foe.  They have come to this place to kill the dragons, to reclaim and reopen the mines, and to free the land of Weston from the scourge of Ancalagon the Black and his clan.  They face incredible odds, but Godric has the heart of a lion.

He will kill the dragon or die in the attempt.


The game was a lot of fun, and the six of us had a great time.  I even made the lemonade black (in order to be intimidating).  We had pizza, mac and cheese, watermelon, and butter beers.  In the end, however, the last play looked like this:


Sir Godric the Lionhearted and the forces of Weston were successful as the last Black Drake fell to one of the Knights of Weston with Godric looking on.

Here are the temporary cards for Godric and Ancalagon:


Godric is the D&D figure, Cleric of St. Cuthbert.  Ancalagon is the D&D Gargantuan Black Dragon.

Here's the Virtualscape version of the board:


As I said, it was a great game and a lot of fun.  And I'm happy to be back on the blog.

Happy Heroscaping, everybody.


Monday, June 11, 2012

Raynor's Raiders...Raiders, Roll

Wow, has it been a while since I've posted!

I guess it really is a good thing when life is so full that I don't have time to sit at the computer and post a significant blog entry about Heroscape.  I like Heroscape a lot, but I also realize it's a hobby. 

Heroscape provides me with a helpful escape from life from time to time...allowing me to imagine and create worlds filled with deadly swamps, treacherous, snow-covered mountains, broad grassy fields, and deep, dark dungeons.  I get to dabble for a while in a world in which the rules are known and followed by all the players, the purpose is clear, and your enemies are easily identifiable.  In life, it is not always so.

Another way I like to escape for a little while is through Starcraft.  It's another war game, of course, with a little less randomness in the play and a lot more blood and carnage.  I prefer to play as Terrans (I do like my Bunkers and Seige Tanks) rather than Zerg or Protoss.

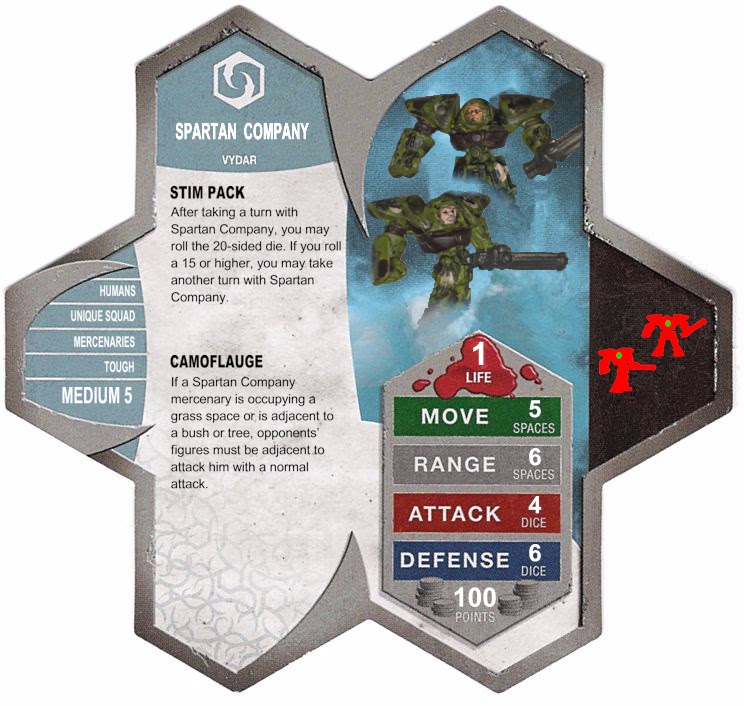
My first attempt at combining the two games was a Unique Squad of two U.E.D. Marines.


I took a couple of Zettian Guards and dug out the heads (Do they really have heads, per se?).  Then I took a couple of extra Drake Alexanders (RoTV) and first, cut their heads off, then cut the faces off the heads.  I glued the faces into the head cavities of the two Zettian Guards, then painted them in camoflauge.  They turned out pretty well, and my friends (some of whom also play Starcraft) enjoyed playing with them.

After the release of Starcraft II: Wings of Liberty, however, I was no longer satisfied with my little squad of two marines.  I wanted more!

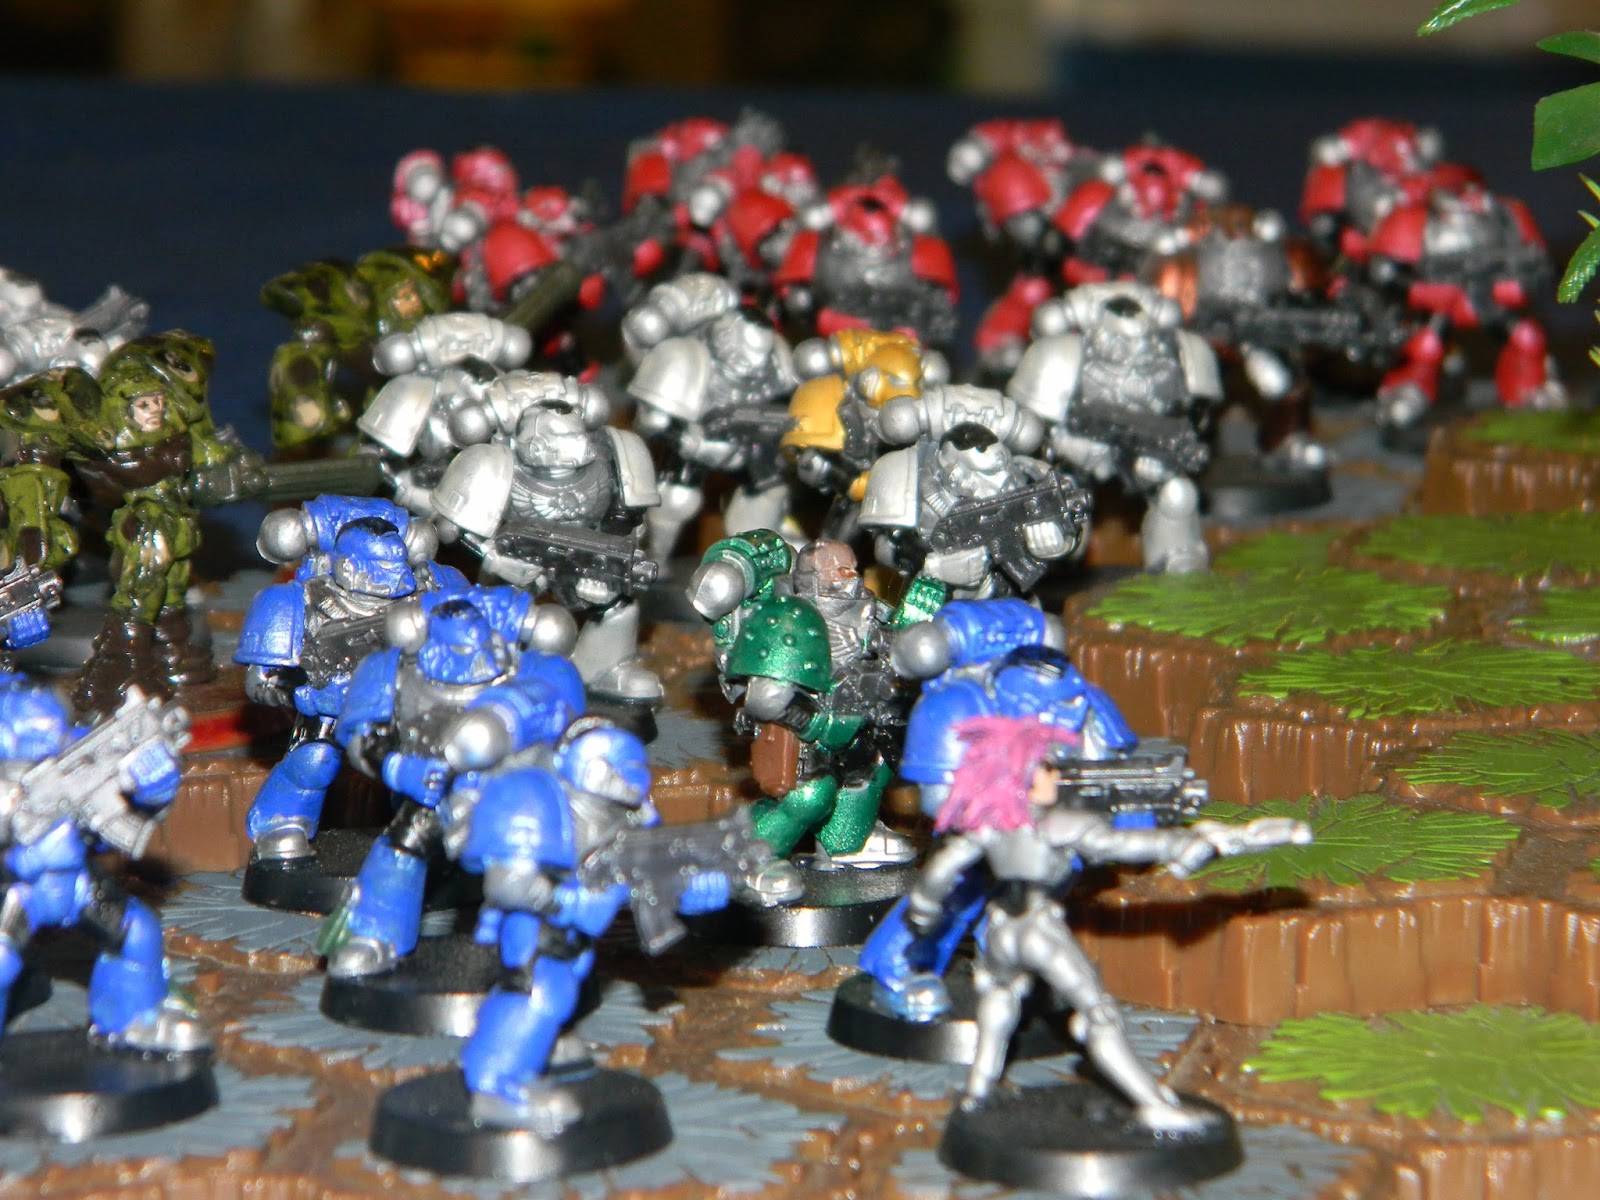
Then I found a set of Tactical Squad of Warhammer 40K Space Marines in a (relatively) local game store, and I knew I'd found what I'd been looking for.  Each box contains 10 marines (For those of you counting at home, that means three common squads of three marines each and one unique hero.  Perfect!) that I could build however I wanted to.  I had to have them.

So, of course, I bought the box, and then, of course, I let it sit on my shelf for about 8 months.

Last April, though, I took a week of staycation, and finally got them out and start working on them, cutting them off the sprues and piecing them together with a little super glue.


My wife was kind enough to take a few pictures of the process for this blog entry (which I had planned all along).


Of course, having been inspired by Wings of Liberty, the marines I made were Raynor's Raiders ("Raiders roll..."), with Jim Raynor as their Hero.


Keeping with the theme of the original Starcraft, Raynor's Raiders had to be blue.  I used a base of a bright blue and then did a second coat in a metallic blue with some silver and some black metallic paint.  I also used gunmetal gray metallic paint for the weapong.  It turned out great.  I highly recommend the gunmetal gray.

I painted Raynor, in a metallic green, rather than blue...to keep with the Starcraft theme and to help distinguish him from the Raiders.

The final result was this:


Me like!

Once the figures were done, of course, I had to go to work on the cards.


I already had worked out some of what the stats and powers would be, but I had to put them in card form and work out a few of the kinks.  Here's how they came out:


For the Raiders, I kept the Stim Pack power from my original squad of marines, but exchanged the camoflauge (which didn't seem appropriate) for Commander Bonding.  Jandar still seemed to be the best ideological fit for Raynor and his Raiders.


For Raynor, I used the idea of Raynor's special power in Belly of the Beast (the next to the last mission of Wings of Liberty, if you choose to do it) and used the language of the Fire Line Special Attack to create his Perdition Shot Special Attack (Awesome!), and I took a page from the Orcs and gave him Marine Enhancement to go with their bonding power.

They turned out beautifully!


Of course, I couldn't stop there.  I needed to have marines from all three Terran factions, Raynor's Raiders, the Terran Dominon, and the U.E.D.  So I bought a couple more sets of marines off ebay, and made myself some more to complete my collection.  I also gave the marines from each faction slightly different powers and point values, so a player can choose the value of the marnies he wants to play with (they all have Stim Pack, though).

So in addition to Jim Raynor with his three squads of Raynor's Raiders, I now have three squads of U.E.D. Marines ("I've been waiting on you..."),  in white armor, in keeping with Omega, the last mission of Brood War) with Adm. Alexei Stukov as the companion hero.  They follow Einar.


And I have three squads of the Sons of Korhal ("You want a piece of me, boy?") in red armor, also in keeping with Omega, the last mission of Brood War), with Gen. Horace Warfield as the companion hero (who has Shredder Grenades and a Flame Thrower).  They follow Wyndar (a not as evil as Utgar or Valkrill, but not good Valkyrie my son Ben and I created that calls the desert home...seemed appropriate for Korhal and Mengsk's marines).


As for my original squad of two marines, I was going to just retire them as prototypes whose time had passed, but then I had an idea.  I renamed them and turned them into mercenaries (again in keeping with the theme of Wings of Liberty).


Oh, I also made a few other Starcraft-themed figures as well, but I think I've blogged enough for now.

Happy heroscaping!

Friday, March 16, 2012

Valkyrie Shrines - Ullar

You may have guessed from the green background of my blog, but Ullar is my favorite of the Valkyrie.  This is so because I do love the elves.  They are my favorite species to play with on the whole, and Sonlen is sort of my alter ego in the game.  He is the figure I go to when I need a good one to fill out my army.


His ability to Dragon Swoop is very effective against Soulborgs and other figures with a high defense or squads like the Krav Maga Agents with their Stealth Dodge (another favorite of mine).  Add his Dragon Healing to that and a moderate ranged attack and you have one powerful figure.

Anyway, I like the elves, so Ullar is my preferred Valkyrie.

Below are some pictures of the Ullar Shrine.

The main part of the shrine is a piece of driftwood that I got from my grandmother when she died.  It originally had a seagull on it.  We used to feed the seagulls on the beach of the Gulf of Mexico when Grandma and Grandpa would go to Texas for the winter.  I took the seagull off and glued some light green clump foliage (from the model train store).  As Ullar has a wood and forest kind of theme, his shrine needed to include wood and greens and water.

There is also a Paint Pot rock filled with some hot glue and painted blue for a pool of water, and a Syvarris figure as a statue (I like to include a figure in the shrine design).  The pool figures prominently in alternate side of the shrine card.

The primary side is pretty much like the Jandar Shrine:


The stone, as the source of the shrine's power, is the only targetable object.

The alternate side of the shrine's card, Ullar's Fountain of Life, has healing powers for those who stand in the open space of the shrine and also gives a bonus movement.


Here is the shrine in the one board we've played with it, an Ullar fortress named Talos Orn, where an alliance of men and elves, together with the Green Dragonwing, stand against an assault of the Black, Red, and Blue Dragonwings, with their hordes.


The Ullar Shrine could be a good addition to any forest board or Ullar themed board to give an Ullar army that little bit of extra advantage that may turn the tide of battle.

Next time, I'll put up the Einar shrine, a custom piece which I'm pretty proud of.

Until then, happy heroscaping.